P
I'm a software engineer interested in Cloud technologies and web applications.
Search for a command to run...
I'm a software engineer interested in Cloud technologies and web applications.
No comments yet. Be the first to comment.
In this series, I will be showing you how to deploy a full stack application (Angular, Express.js, DynamoDb) to AWS utilizing the AWS CDK, ECR, and ECS.
For the past several months, I have been developing a SaaS product. This is my first post in a series to show you how to build your own product and deploy it to AWS. We will be creating an Angular frontend, Express.js backend, and using DynamoDb data...
A lot of the documentation can be found here on Spring's website about the threat. The most important part is the second paragraph. Spring Boot users are only affected by this vulnerability if they have switched the default logging system to Log4J2....

AWS CDK Pro Tips

Query a Postgres database using a Lambda in 5 minutes!

Beware Implicitly 'any'!

Learn about the benefits of serverless

In my prvevious post we put together a starter project for a SaaS product. Today, I am going to show you how to add Authentication to an Angular project by using AWS Amplify. This requires you to have an AWS account and may incur small charges to get this working.
🐦 Follow me on Twitter to see all vital content! 🐦
TLDL: Here is the code in my GitHub. Here is a look at my pull-request with the necessary changes.
Follow these instructions on how to install and configure the Amplify CLI.
Checkout my starter project on GitHub. Make sure you start on the feature/step-1-setting-up branch!
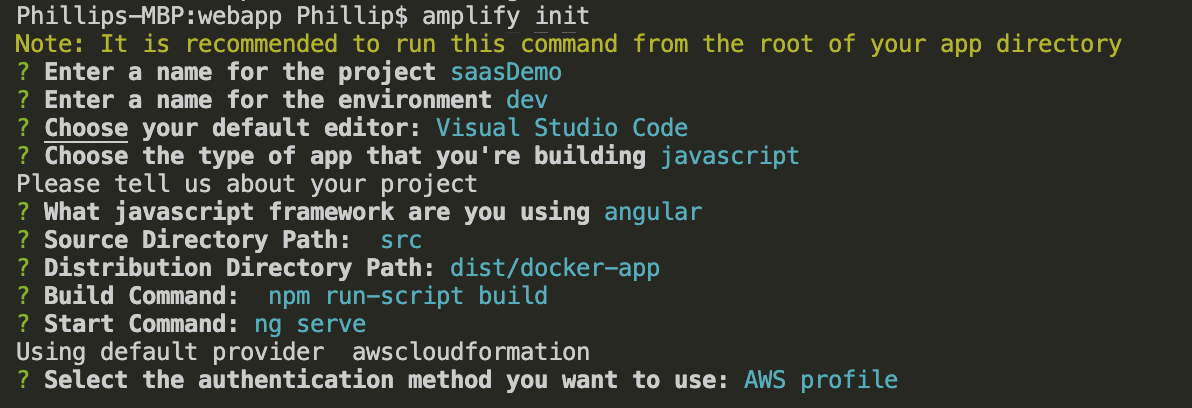
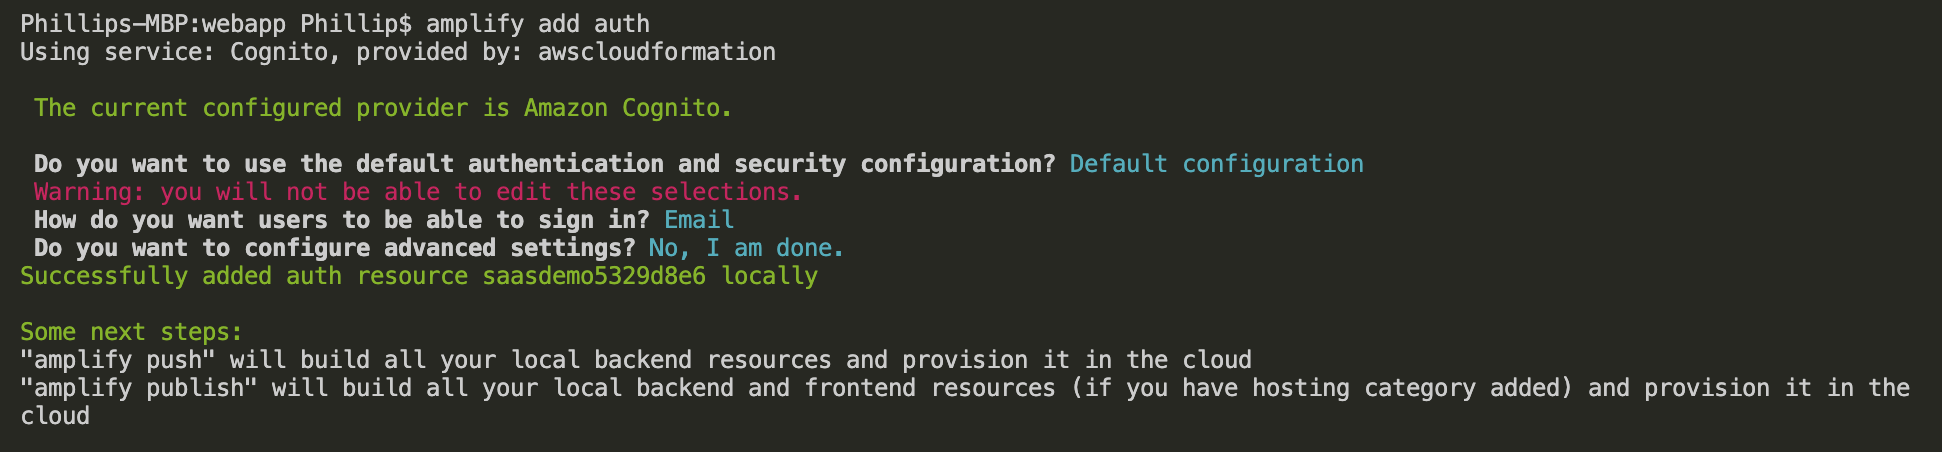
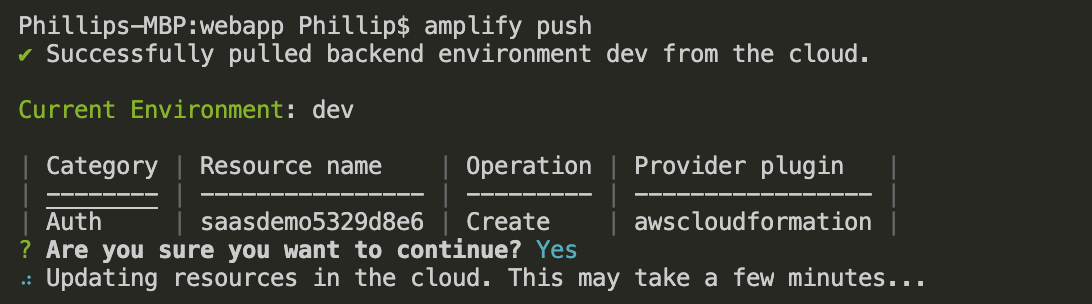
Run the following code in the webapp folder. This will initialize an amplify project in our Angular project. You will then configure authentication. Finally, we will push these changes to AWS. You will be asked to login to your AWS account.
amplify init
# make sure you store your keys for the new user!
amplify configure
amplify add auth
amplify push
Install the UI using NPM.
npm install aws-amplify @aws-amplify/ui-angular
Update app.module with this new code. We need to add imports for the AWS packages.
import Amplify, { Auth } from 'aws-amplify';
import {AmplifyUIAngularModule} from "@aws-amplify/ui-angular";
import awsconfig from './aws-exports';
Amplify.configure(awsconfig);
...
imports: [
  ...,
 AmplifyUIAngularModule
],
AWS Amplify requires a global variable to be accessible. Add this to the top of the file src/polyfill.ts
(window as any).global = window;
(window as any).process = {
env: { DEBUG: undefined },
};
Replace all the template code in app.component.html with this
<amplify-authenticator>
<div>
 My App
 <amplify-sign-out></amplify-sign-out>
</div>
</amplify-authenticator>
Use a git ignore for amplify/team-provider-info.json. The file has sensitive info you don't want in source control!
That's it! You should be able to run ng serve and be greeted with a login screen.
If you simply want to pull my git repo you will need to delete the amplify folder and run the following commands:
amplify init
# make sure you store your keys for the new user!
amplify configure
amplify add auth
amplify push
Here is the code in my GitHub. Here is a look at my pull-request with the necessary changes.
🐦 Follow me on Twitter to see all vital content! 🐦
Here are some screenshots from my setup: